
How OpenShift AI Streamlines ML Workflows for Faster, More Efficient Delivery
How OpenShift AI Streamlines ML Workflows for Faster, More Efficient Delivery
In this article, I want to share what I presented at Red Hat Summit Connect London 2025 about how Red Hat OpenShift AI streamlines ML workflows for faster, more efficient delivery. This session was based on a live demo using the fraud detection example provided by Red Hat, and I want to walk you through the key concepts of the inner loop and outer loop in MLOps using OpenShift Pipelines.
If you have read my previous article on ML Workflows, you already know the principles and stages needed to implement a successful AI project. Now, let’s see how OpenShift AI puts those principles into practice.
What is OpenShift AI?
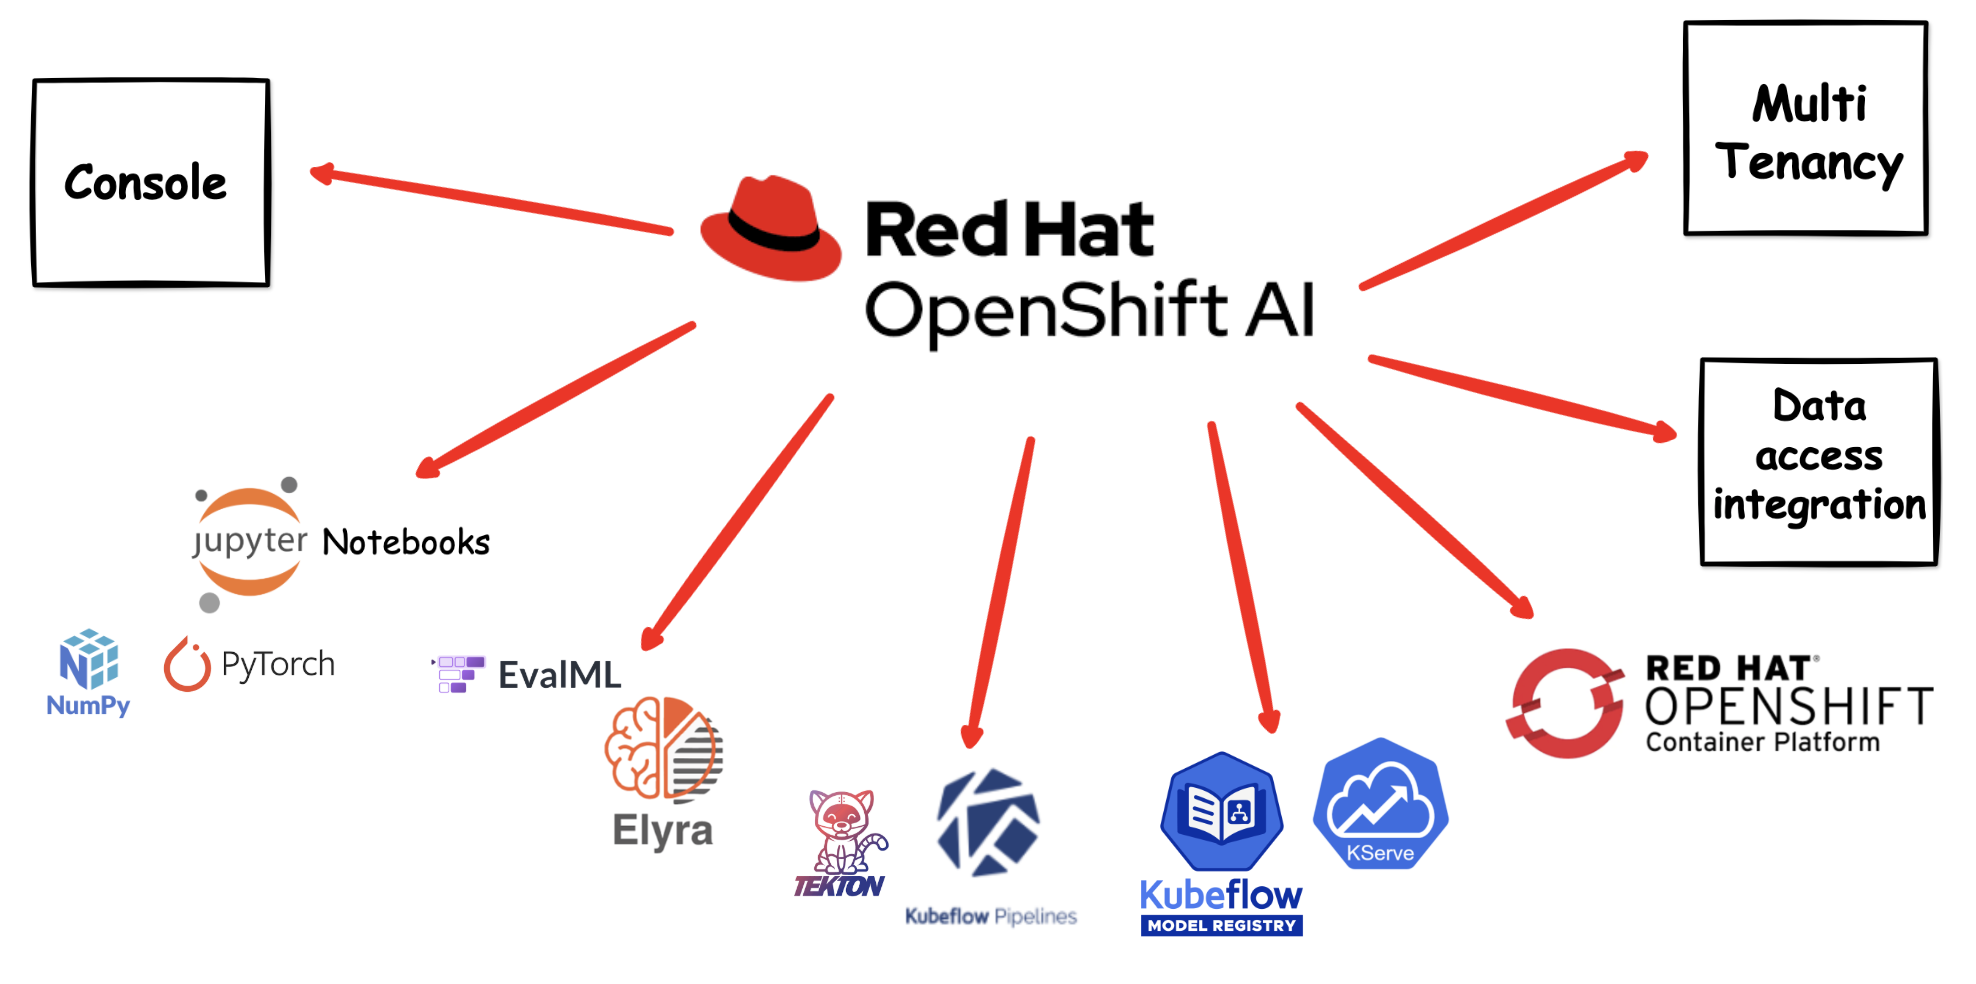
Red Hat OpenShift AI is a flexible and scalable MLOps platform built on top of OpenShift. It provides data scientists and ML engineers with the tools they need to build, train, deploy, and monitor machine learning models — all within a consistent, enterprise-grade Kubernetes environment.
OpenShift AI brings together:
- JupyterLab workbenches for interactive development and experimentation
- Data science pipelines for automating and orchestrating ML workflows
- Model serving for deploying trained models as REST/gRPC APIs
- Model registry for versioning and managing trained models
- Distributed training support using frameworks like Ray and the Training Operator
The platform is designed to bridge the gap between data science experimentation and production-grade ML delivery, making it easier for teams to collaborate and move models from notebook to production.
Why Use OpenShift AI?
You might be wondering — why run your data science workloads on OpenShift and Kubernetes instead of a standalone ML platform or a local machine? There are several compelling reasons:
-
Scalability on demand — Openshift/Kubernetes can scale your training jobs from a single pod to hundreds of workers across the cluster. When you need more compute power for large datasets or complex models, you simply scale up. When the training is done, those resources are released for other workloads.
-
GPU sharing and management — OpenShift manages GPU resources across the cluster, allowing multiple data scientists to share expensive GPU hardware efficiently rather than each person needing a dedicated GPU workstation.
-
Consistency across environments — With containerised workbenches and pipelines, the environment you use for development is identical to the one used in production. No more “it works on my laptop” problems. Your model training is reproducible every time.
-
Enterprise-grade security — OpenShift provides built-in RBAC, network policies, secrets management, and integration with enterprise identity providers. Your data and models are protected with the same security standards as the rest of your applications.
-
Self-service for data scientists — Data scientists can provision their own workbenches, attach storage, and run experiments without waiting for IT to set up infrastructure. OpenShift AI provides a user-friendly dashboard that abstracts away the Kubernetes complexity.
-
Unified platform — Instead of managing separate tools for notebooks, pipelines, model serving, and monitoring, OpenShift AI brings everything together in one platform. This reduces operational overhead and simplifies the MLOps toolchain.
-
Hybrid and multi-cloud flexibility — OpenShift runs on bare metal, VMware, AWS, Azure, GCP, and edge environments. Your ML workflows are portable across any infrastructure, avoiding vendor lock-in.
-
Cost efficiency — By sharing cluster resources across teams and workloads, you avoid the waste of idle GPU machines or over-provisioned cloud instances. Kubernetes scheduling ensures resources are allocated where they are needed most.
Running your data science projects on OpenShift means you benefit from all the operational maturity that platform teams have already built for application workloads — monitoring, logging, CI/CD, GitOps — and apply that same discipline to your ML workflows.
The Inner Loop and Outer Loop in MLOps
One of the most important concepts when working with MLOps on OpenShift AI is understanding the inner loop and outer loop. These two loops represent different phases of the ML lifecycle and map directly to how teams work day-to-day.
The Inner Loop — Experimentation and Development
The inner loop is where data scientists spend most of their time. It’s the rapid, iterative cycle of:
- Exploring data — Understanding your dataset, identifying patterns, and performing feature engineering.
- Experimenting with models — Trying different algorithms, hyperparameters, and training configurations.
- Training models — Running training jobs in JupyterLab workbenches using frameworks like TensorFlow, PyTorch, or scikit-learn.
- Evaluating results — Comparing model performance metrics, accuracy, precision, recall, and other relevant indicators.
- Iterating — Refining the model based on evaluation results and repeating the process.
In OpenShift AI, the inner loop happens inside workbenches. A workbench is an instance of your development environment (e.g. JupyterLab) that runs directly on the OpenShift cluster. This means you get the compute power of the cluster without needing to install anything locally. You can attach storage connections (e.g. S3 buckets) to persist your data and models, and you can use GPUs if your cluster has them available.
The inner loop is all about speed and iteration. You want to be able to try things quickly, fail fast, and learn from each experiment.
The Outer Loop — Automation and Production
The outer loop is where MLOps engineering takes over. Once a data scientist has a model that performs well, the outer loop automates the steps needed to move that model into production:
- Automated pipelines — Using OpenShift Pipelines (based on Kubeflow Pipelines) to automate data preparation, training, evaluation, and model packaging.
- Model registration — Storing the trained model in a model registry with metadata, versioning, and lineage tracking.
- Model serving — Deploying the model as a scalable API endpoint using model serving runtimes like OpenVINO or custom serving runtimes.
- Monitoring and retraining — Watching for model drift, data drift, or performance degradation, and triggering retraining when needed.
The outer loop is about reliability, reproducibility, and automation. By codifying the workflow as a pipeline, you ensure that every model deployment follows the same process, reducing human error and making it auditable.
Configuring OpenShift AI Workbenches
Before you can start experimenting, you need to set up your environment in OpenShift AI:
-
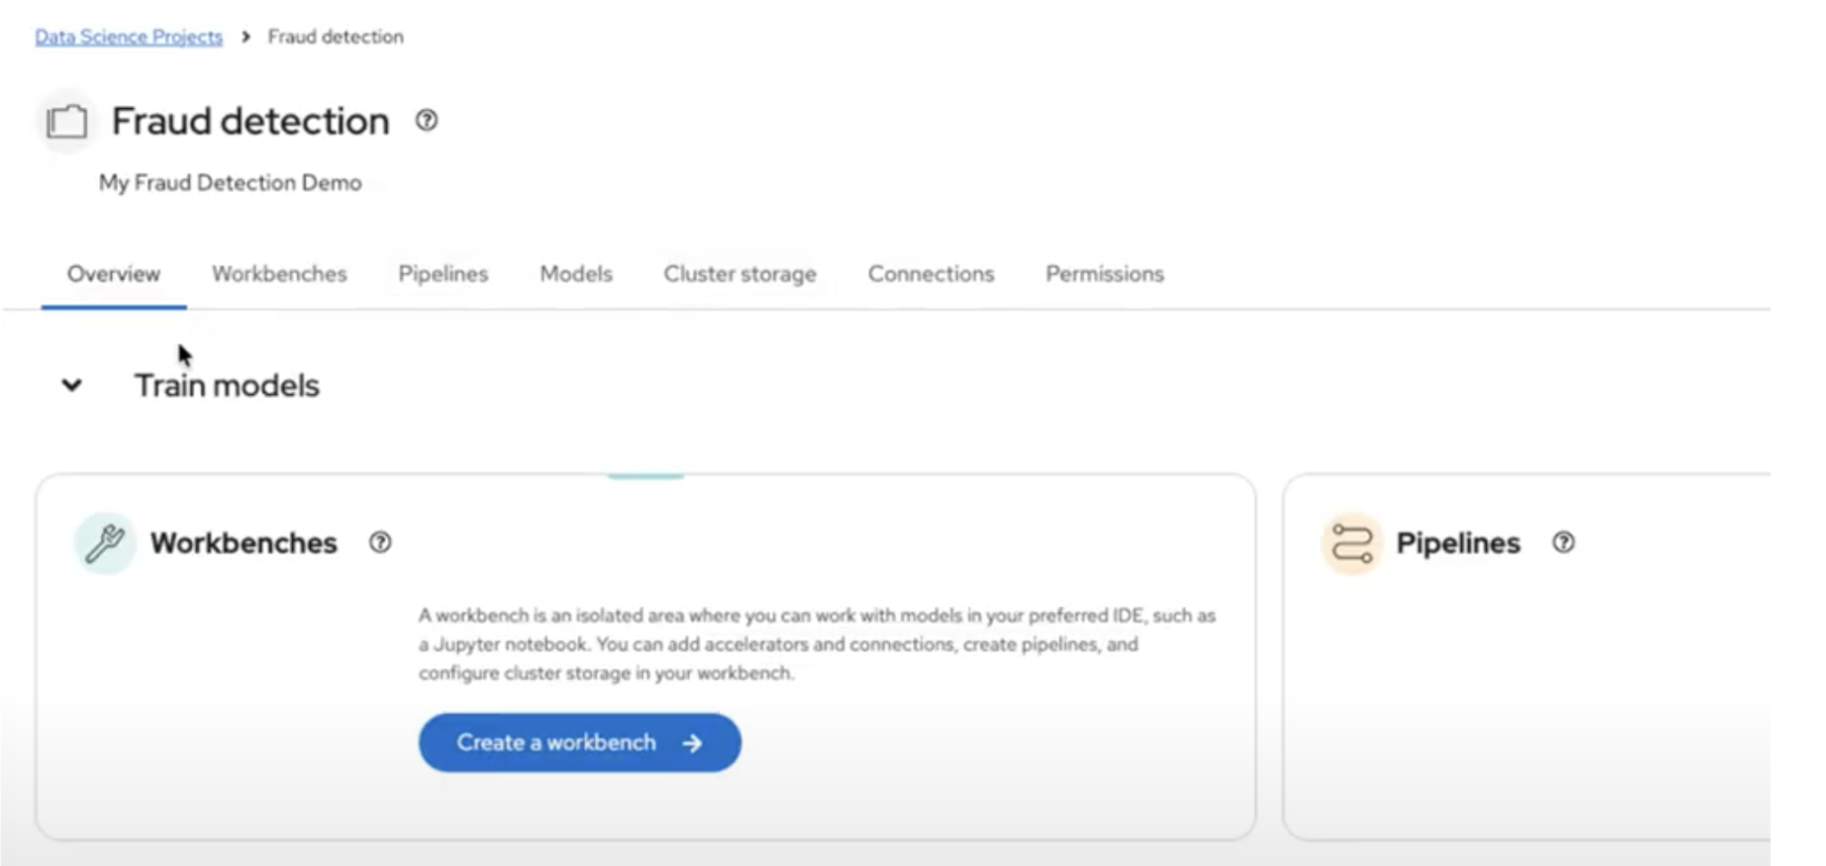
Create a Data Science Project — In the OpenShift AI dashboard, navigate to Data Science Projects from the left-hand menu and click Create project. Give it a name and description. This project acts as a namespace where all your ML resources live — workbenches, pipelines, models, and storage connections are all scoped to this project.
-
Set up Storage Connections — Inside your project, click the Connections tab and then click Create connection. Select S3 compatible object storage as the connection type and fill in your endpoint URL, access key, secret key, region, and bucket name. You’ll typically create at least two connections: one for your data and models, and another for pipeline artifacts.
-
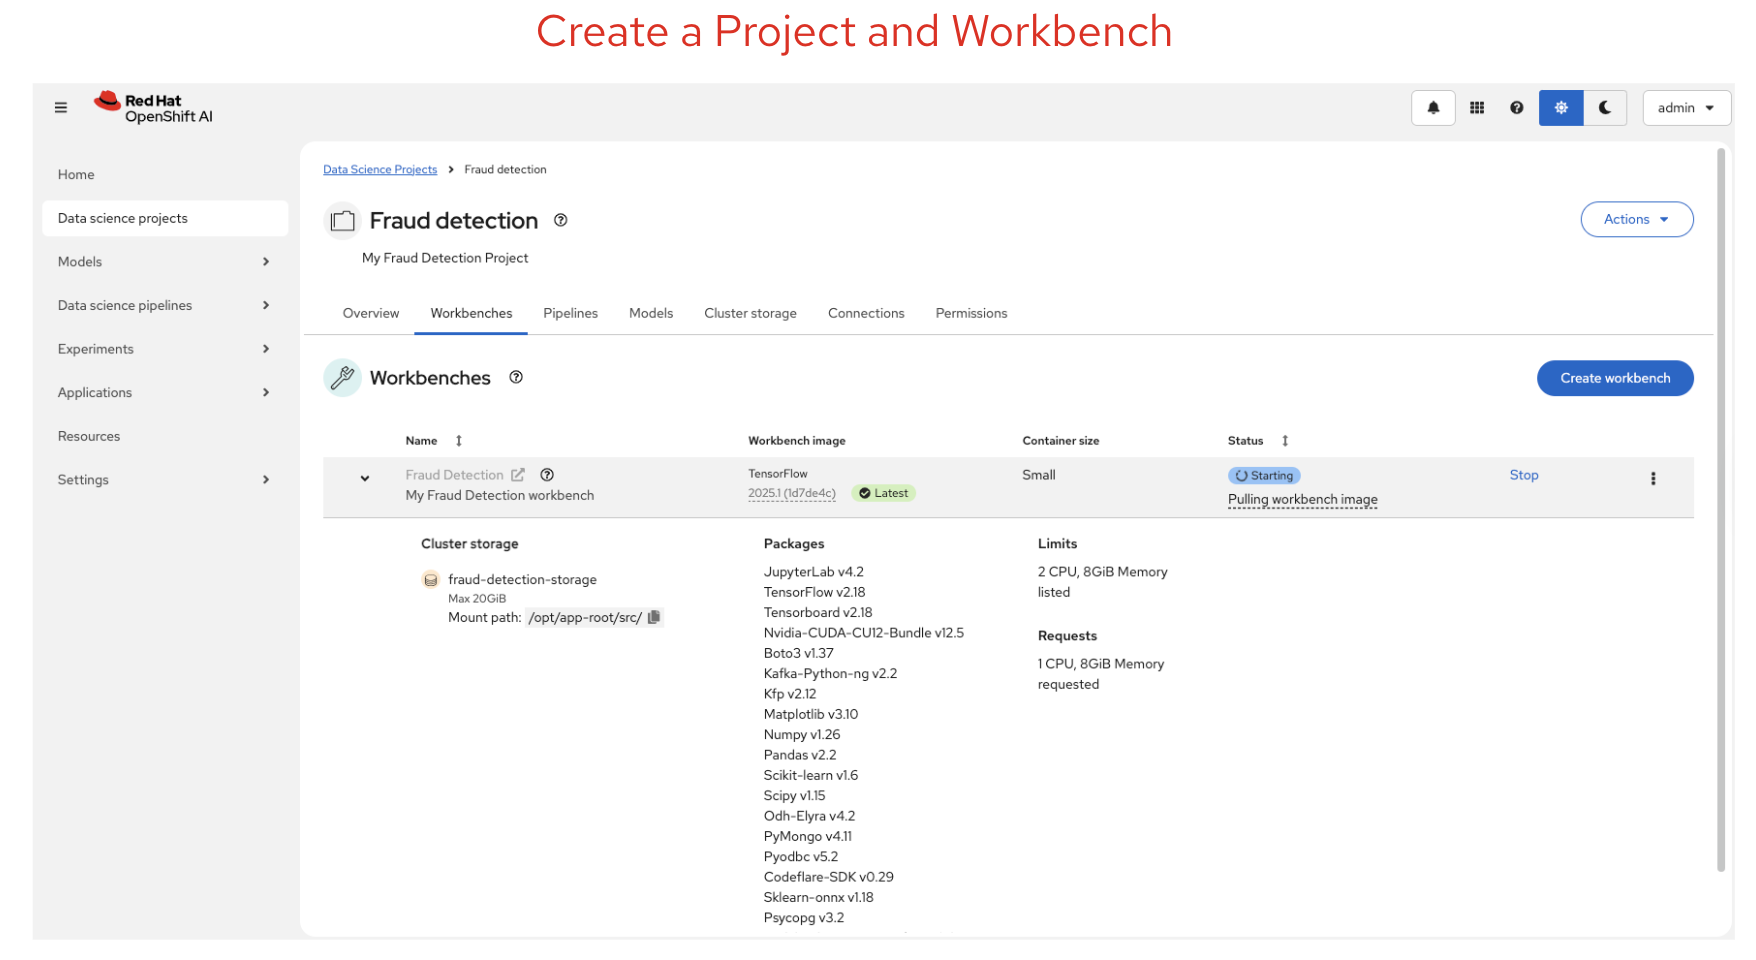
Create a Workbench — Inside your project, click the Workbenches tab and then click Create workbench. Give it a name, select a workbench image (e.g. TensorFlow, PyTorch, or Standard Data Science), choose a deployment size (small, medium, or large depending on your compute needs), and optionally attach a GPU accelerator if available. Under Connections, click Attach existing connection to link your S3 storage. Once created, the workbench status changes from
StartingtoRunning, and you can click Open to launch your JupyterLab environment. -
Enable Pipelines — Inside your project, click the Pipelines tab and then click Configure pipeline server. Select your pipeline artifacts connection from the dropdown — this tells OpenShift AI where to store pipeline outputs. Click Configure pipeline server and wait for it to become ready before creating your workbench, so that your notebooks can submit pipelines.
Once your environment is ready, you can start importing notebooks, running experiments, and building pipelines.
In the image below, you can see the data science workbench created with the available Python libraries. You can also customise these libraries.
The Fraud Detection Demo
The demo I presented at Summit Connect was based on the Red Hat OpenShift AI Fraud Detection tutorial. This is a great hands-on example that walks you through the entire ML workflow. Here’s how to set it up and run it yourself:
Step 1: Clone the Demo Repository into JupyterLab
Once your workbench is running, click Open to launch JupyterLab. In the JupyterLab toolbar, click the Git Clone icon (or go to Git > Clone a Repository). Enter the following URL:
https://github.com/rh-aiservices-bu/fraud-detection.git
Select Include submodules and click Clone. The fraud-detection folder will appear in your file browser. Double-click it to open it.
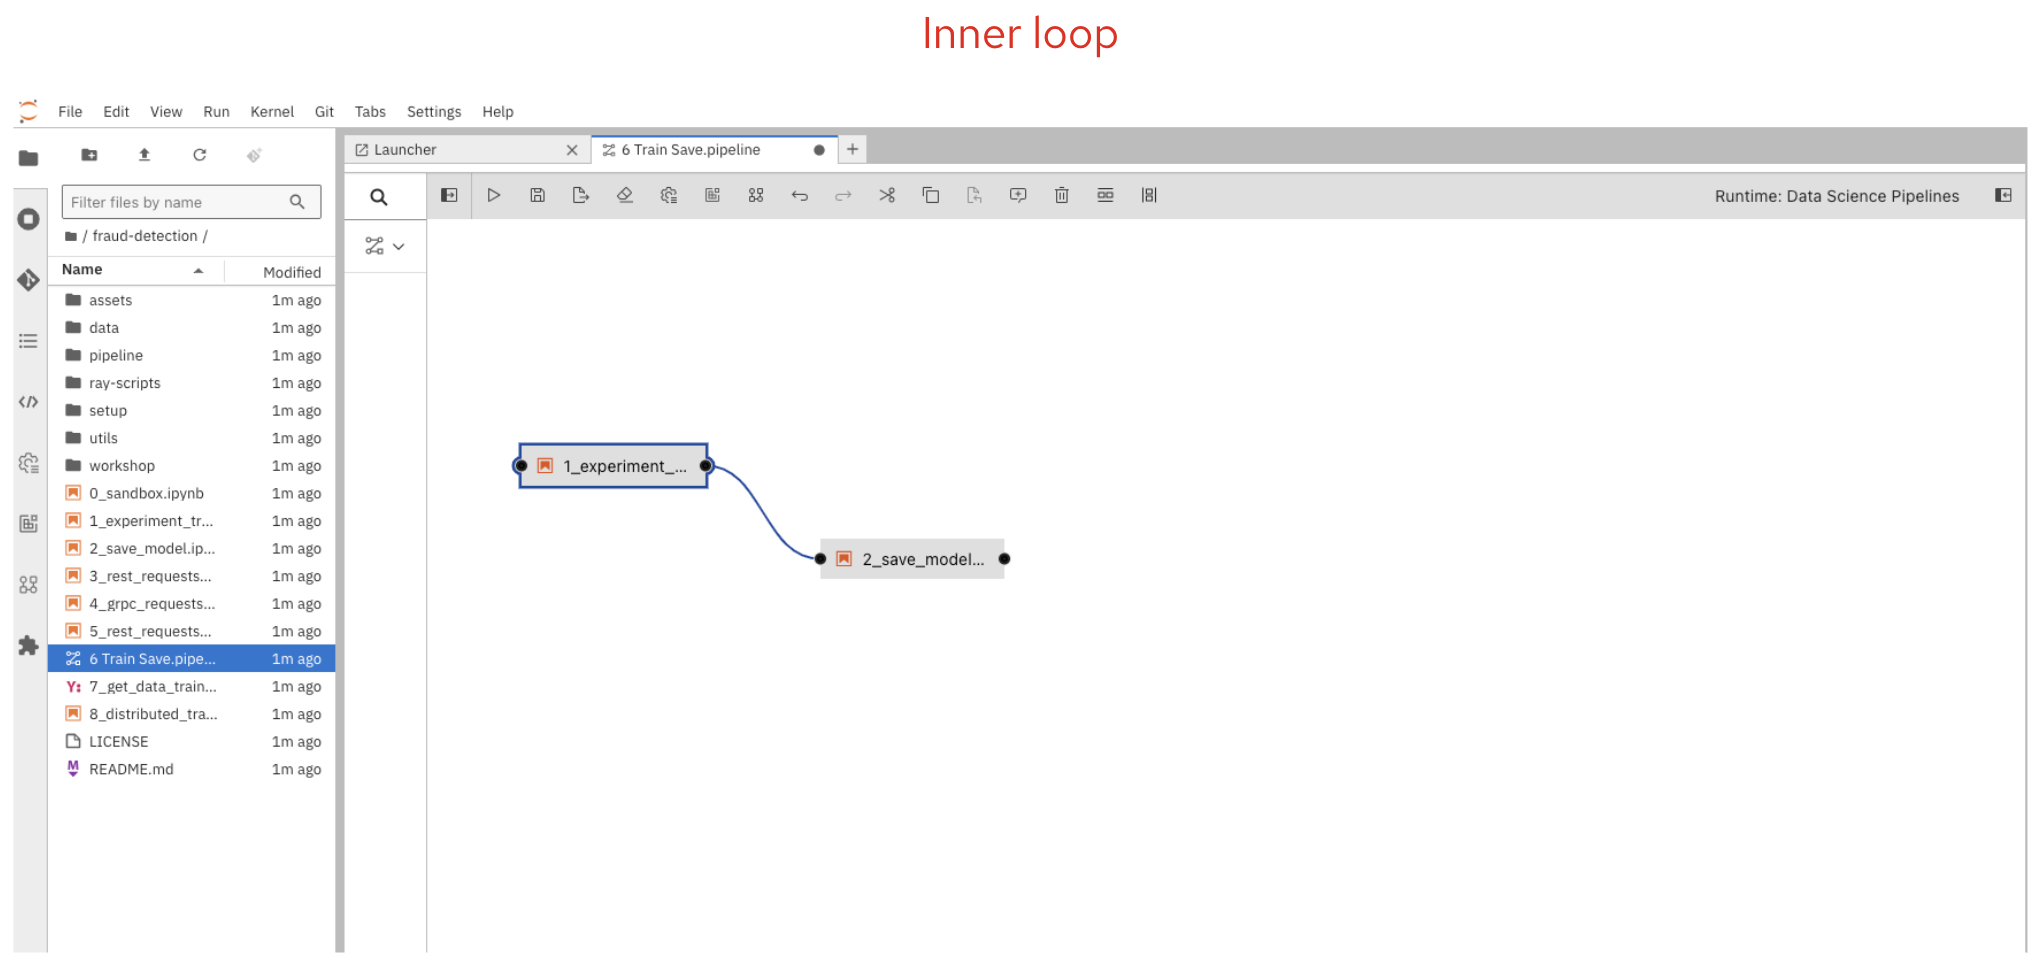
Step 2: Explore the Data and Train the Model (Inner Loop)
Open the 1_experiment_train.ipynb notebook. This notebook walks you through:
- Exploring the data — Understanding credit card transaction data, visualising patterns, and identifying indicators of fraud such as geographical distance from the last transaction, price compared to median, and payment method (chip, PIN, or online).
- Training the model — Building and training a fraud detection model using TensorFlow. The notebook guides you through each cell — run them one by one using
Shift + Enteror click the Run button in the toolbar.
Once the model is trained, open 2_save_model.ipynb to convert the model to ONNX format and upload it to your S3 storage bucket via the connection you configured earlier.
Step 3: Deploy and Test the Model
After saving the model, go back to the OpenShift AI dashboard. Navigate to your project and click the Models tab. Click Deploy model (for multi-model serving) or Select single-model (for single-model serving):
- Set the Model deployment name to
fraud - Select OpenVINO Model Server as the serving runtime
- Select onnx-1 as the model framework
- Select your My Storage connection and set the path to
models/fraud - Click Deploy
Wait for the status to show a green checkmark. Copy the Inference endpoint URL — you’ll use this to test the model. Back in JupyterLab, open the relevant test notebook (3_rest_requests_multi_model.ipynb for multi-model or 5_rest_requests_single_model.ipynb for single-model) and follow the instructions to send test requests to your deployed model.
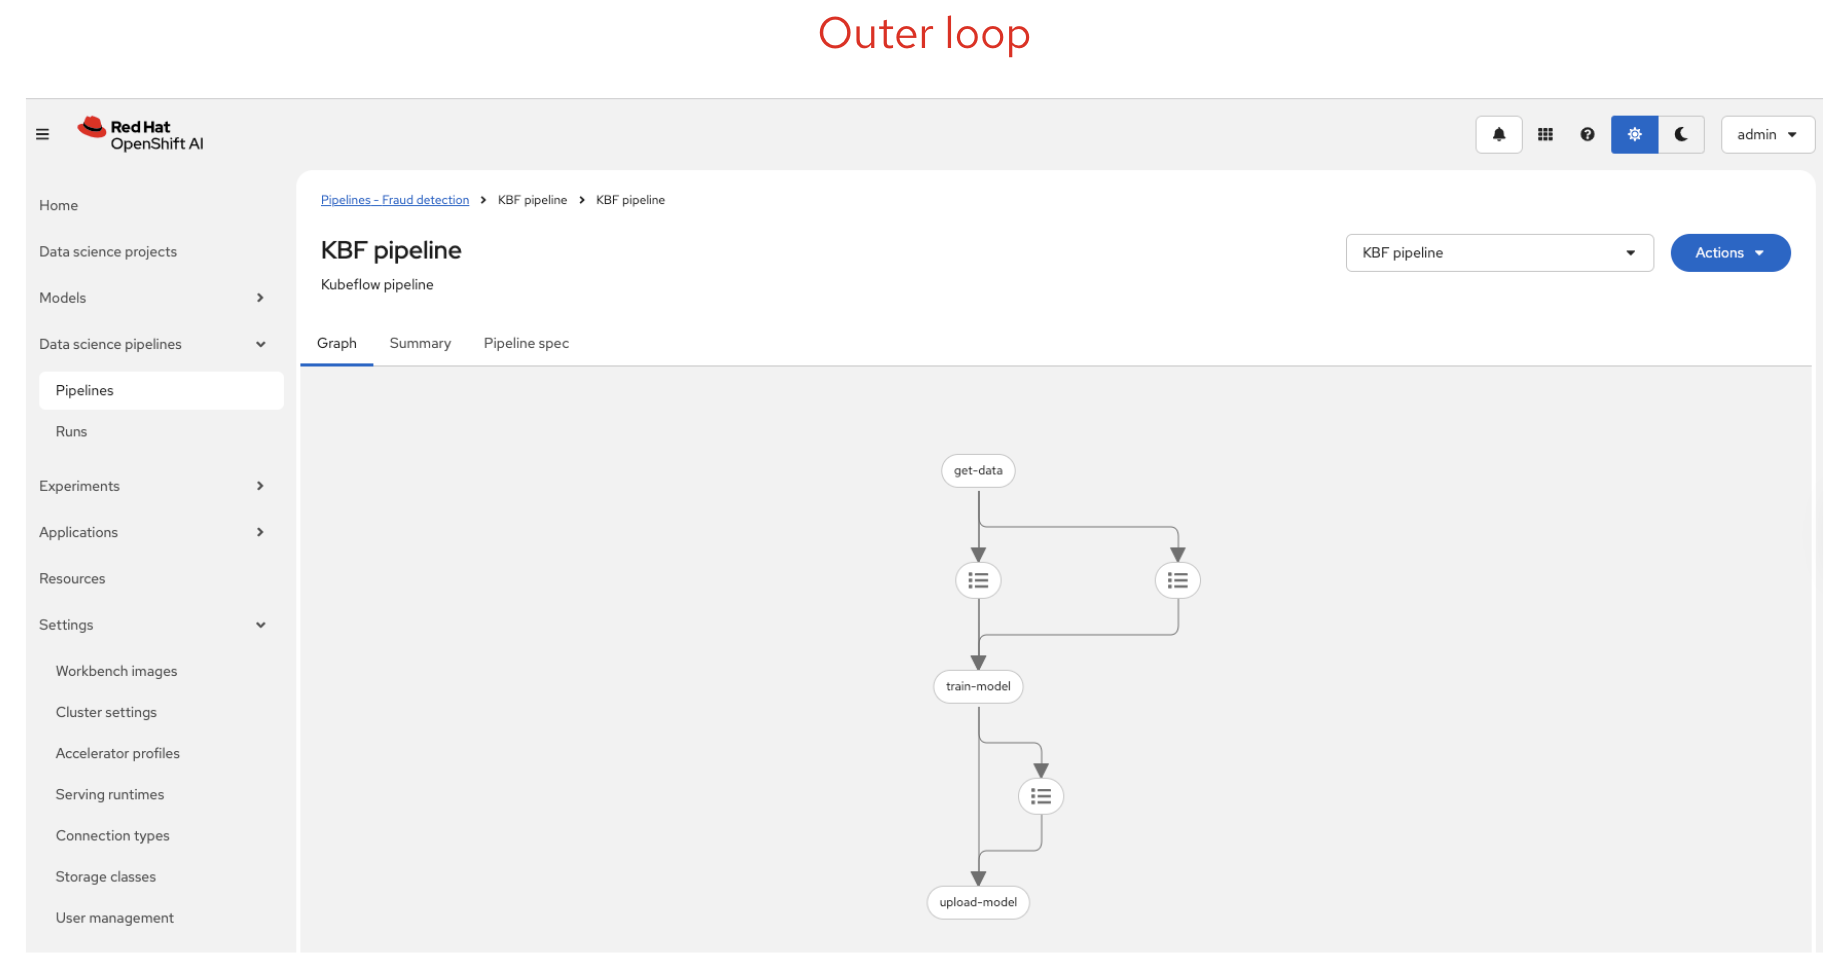
Step 4: Automate with Pipelines (Outer Loop)
This is where the outer loop comes in. Instead of running notebooks manually, you create a pipeline that automates the entire workflow.
In JupyterLab, click the + button to open the launcher, then click Pipeline Editor to create a new blank pipeline. From the file browser, drag 1_experiment_train.ipynb and 2_save_model.ipynb onto the pipeline canvas. Connect them by clicking the output port of the first node and dragging a line to the input port of the second node.
For each node, configure the Runtime Image (set it to Tensorflow with Cuda and Python 3.11), add file dependencies (e.g. data/*.csv for the training node), and set the output file to models/fraud/1/model.onnx. For the second node, add your S3 connection credentials as Kubernetes Secrets so the pipeline can upload the model without hardcoding any keys.
Alternatively, you can skip the manual pipeline creation and use the pre-built 6 Train Save.pipeline file that comes with the repository.
To run the pipeline, click the play button in the pipeline editor toolbar, give it a name, verify the runtime configuration is set to Data Science Pipeline, and click OK.
Step 5: Monitor the Pipeline Execution
To check the execution, go back to the OpenShift AI dashboard. Navigate to your project, click the Pipelines tab, and expand your newly created pipeline. Click View runs to see the list of runs. Click on your run to view the pipeline execution in real time — you’ll see each node turn green as it completes successfully. If a node fails, click on it to view the logs and debug the issue.
Once the pipeline completes, the trained model is automatically saved to your S3 bucket and ready to be served.
Step 6: Distributed Training (Optional)
For more complex models that need more compute power, the tutorial also covers distributed training. Open 8_distributed_training.ipynb to learn how to use Ray to parallelise training across multiple CPUs, or open 9_distributed_training_kfto.ipynb to use the Training Operator with PyTorch for distributed training jobs.
This example demonstrates both the inner loop (notebook experimentation in steps 1-2) and the outer loop (pipeline automation and model serving in steps 3-5) in action.
Model Registry
Once your model is trained and validated, you need a way to manage it. The model registry in OpenShift AI provides:
- Version control for your models — Track which version is deployed and roll back if needed.
- Metadata and lineage — Know exactly which data, parameters, and code were used to produce each model version.
- Collaboration — Share models across teams and projects with confidence.
The model registry acts as the bridge between the inner loop (where models are created) and the outer loop (where models are deployed and managed).
Model Serving
After registering your model, you can deploy it for inference using OpenShift AI model serving. OpenShift AI supports two serving platforms:
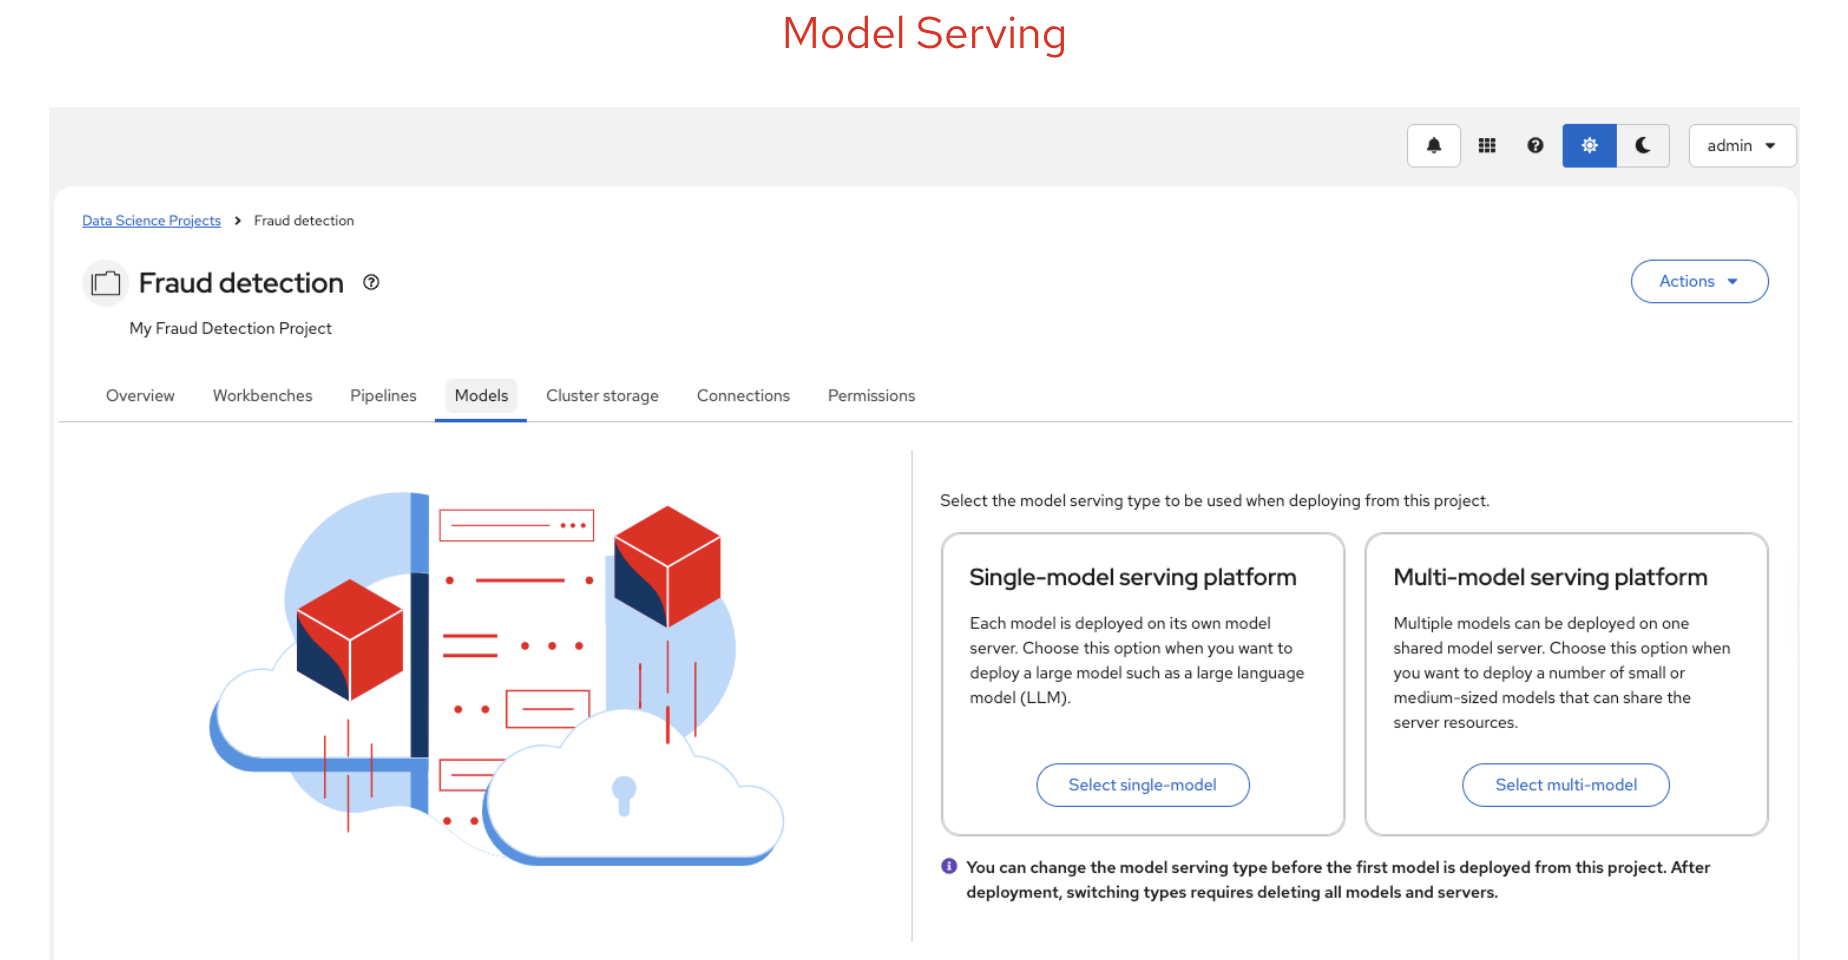
- Single-model serving — Each model gets its own dedicated model server. Best for large models or models requiring dedicated resources.
- Multi-model serving — Multiple models share the same model server. Best for lightweight models or when you need to optimise resource usage.
Both platforms support REST and gRPC APIs, making it straightforward to integrate your model into applications.
Key Takeaways
- OpenShift AI streamlines ML workflows by providing a unified platform for experimentation, automation, and deployment.
- The inner loop focuses on rapid experimentation and iteration in workbenches.
- The outer loop automates the path to production using pipelines, model registry, and model serving.
- By separating these concerns, teams can deliver ML models faster and more efficiently while maintaining reliability and reproducibility.
What Else Does OpenShift AI Offer?
It’s worth noting that this tutorial and demo only scratch the surface of what OpenShift AI can do. There are several features in the latest version that we did not cover here, including:
- Model Catalog — A curated catalog of pre-built, ready-to-deploy models that you can use as a starting point instead of training from scratch.
- Gen AI Studio — A built-in environment for experimenting with large language models (LLMs) and generative AI, including MCP server integration for connecting models to external tools and data sources.
- Custom Serving Runtimes — Support for bringing your own model serving runtimes beyond the default OpenVINO and Caikit options.
- Advanced Monitoring — TrustyAI for model bias detection, explainability, and fairness monitoring in production.
- Guardrails — Safety and compliance guardrails for generative AI deployments.
For a full overview of all capabilities and the latest features, visit the official Red Hat OpenShift AI page: Red Hat OpenShift AI
Try It Yourself
If you want to get hands-on with OpenShift AI, I recommend starting with the Fraud Detection tutorial. It covers the full ML workflow end-to-end, from data exploration to model serving, and is a great way to learn the platform.
The full tutorial is available here: OpenShift AI Tutorial - Fraud Detection Example
If you don’t have access to an OpenShift cluster with OpenShift AI installed, you can provision a free 30-day trial using the Red Hat Developer Sandbox. This gives you a fully functional OpenShift AI environment to work through the tutorial and experiment with your own models:
Get your free OpenShift AI 30-day trial
Also, check out my previous article on ML Workflows for an overview of the principles and stages behind a successful AI project.